Amazon AWS-Step 1: Create the VPC
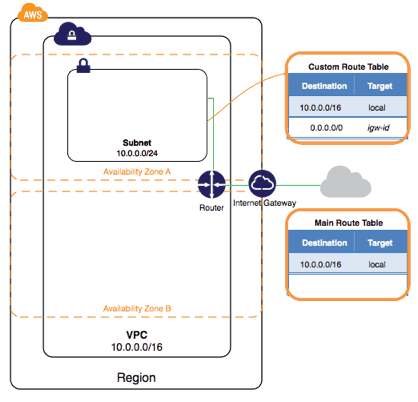
In this step, you’ll use the Amazon VPC wizard in the Amazon VPC console to create a VPC. The wizard performs the following steps for you:
-
- Creates a VPC with a /16 CIDR block (a network with 65,536 private IP addresses).
-
- Attaches an Internet gateway to the VPC.
-
- Creates a size /24 subnet (a range of 256 private IP addresses) in the VPC.
- Creates a custom route table, and associates it with your subnet, so that traffic can flow between the subnet and the Internet gateway.
The following diagram represents the architecture of your VPC after you’ve completed this step.

[bs_icon name=”glyphicon glyphicon-pencil”] Note
This exercise covers the first scenario in the VPC wizard.
To create a VPC using the Amazon VPC Wizard
1.Open the Amazon VPC console at https://console.aws.amazon.com/vpc/.
2.In the navigation bar, on the top-right, take note of the region in which you’ll be creating the VPC. Ensure that you continue working in the same region for the rest of this exercise, as you cannot launch an instance into your VPC from a different region.
3.In the navigation pane, choose VPC dashboard, and then choose Start VPC Wizard.
[bs_icon name=”glyphicon glyphicon-pencil”] Note
Do not choose Your VPCs in the navigation pane; you cannot access the VPC wizard from this page.
4.Choose the first option, VPC with a Single Public Subnet, and then choose Select.
5.On the configuration page, enter a name for your VPC in the VPC name field; for example, my-vpc, and enter a name for your subnet in the Subnet name field. This helps you to identify the VPC and subnet in the Amazon VPC console after you’ve created them. For this exercise, you can leave the rest of the configuration settings on the page, and choose Create VPC.
(Optional) If you prefer, you can modify the configuration settings as follows, and then choose Create VPC.
-
- The IP CIDR block displays the IP address range that you’ll use for your VPC (
10.0.0.0/16), and thePublic subnet field displays the IP address range you’ll use for the subnet (10.0.0.0/24). If you don’t want to use the default CIDR ranges, you can specify your own.
- The IP CIDR block displays the IP address range that you’ll use for your VPC (
-
- The Availability Zone list enables you to select the Availability Zone in which to create the subnet. You can leave No Preference to let AWS choose an Availability Zone for you.
-
- In the Add endpoints for S3 to your subnets section, you can select a subnet in which to create a VPC endpoint to Amazon S3 in the same region.
-
- The Enable DNS hostnames option, when set to Yes, ensures that instances that are launched into your VPC receive a DNS hostname.
- The Hardware tenancy option enables you to select whether instances launched into your VPC are run on shared or dedicated hardware. Selecting a dedicated tenancy incurs additional costs.
6.A status window shows the work in progress. When the work completes, choose OK to close the status window.
7.The Your VPCs page displays your default VPC and the VPC that you just created. The VPC that you created is a nondefault VPC, therefore the Default VPC column displays No.
Viewing Information About Your VPC
After you’ve created the VPC, you can view information about the subnet, the Internet gateway, and the route tables. The VPC that you created has two route tables — a main route table that all VPCs have by default, and a custom route table that was created by the wizard. The custom route table is associated with your subnet, which means that the routes in that table determine how the traffic for the subnet flows. If you add a new subnet to your VPC, it uses the main route table by default.
To view information about your VPC
1.Open the Amazon VPC console at https://console.aws.amazon.com/vpc/.
2.In the navigation pane, choose Your VPCs. Take note of the name and the ID of the VPC that you created (look in the Name and VPC ID columns). You will use this information to identify the components that are associated with your VPC.
3.In the navigation pane, choose Subnets. The console displays the subnet that was created when you created your VPC. You can identify the subnet by its name in Name column, or you can use the VPC information that you obtained in the previous step and look in the VPC column.
4.In the navigation pane, choose Internet Gateways. You can find the Internet gateway that’s attached to your VPC by looking at the VPC column, which displays the ID and the name (if applicable) of the VPC.
5.In the navigation pane, choose Route Tables. There are two route tables associated with the VPC. Select the custom route table (the Main column displays No), and then choose the Routes tab to display the route information in the details pane:
-
- The first row in the table is the local route, which enables instances within the VPC to communicate. This route is present in every route table by default, and you can’t remove it.
- The second row shows the route that the Amazon VPC wizard added to enable traffic destined for an IP address outside the VPC (
0.0.0.0/0) to flow from the subnet to the Internet gateway.
6.Select the main route table. The main route table has a local route, but no other routes.
Related Pages:
WHAT IS AMAZON VPC?
GETTING STARTED WITH AMAZON VPC
- Step 1: Create the VPC
- Step 2: Create a Security Group
- Step 3: Launch an Instance into Your VPC
- Step 4: Assign an Elastic IP Address to Your Instance
- Step 5: Clean Up
Source By: <docs.aws.amazon.com>
To Become AWS Certified please Check out the Link