Cisco CCNA How to configure Multi-Layer Switch

Layer 3 Switch
Now that we have seen how a “router on a stick” works, we can introduce the Layer 3 switch. In the “router on a stick” topology, what if we could bring the router inside the switch? In essence, what if we could give the switch (a layer 2 device) the capability to route (a Layer 3 function). This is what a Layer 3 switch is capable of doing.
There are three points we need to remember:
- By default, the routing capability is not turned on in a Layer 3 switch. We need to issue the ip routing command to enable it from global config.
Switch#Switch#conf t
Enter configuration commands, one per line. End with CNTL/Z.
Switch(config)#ip routing
Switch(config)#
- On a Layer 2 switch the ports cannot be assigned an IP address. If a switch is to act like a router, we need a way to assign IP addresses to ports. This is done by the command switchport under the interface. Switchport makes the port behave like a Layer 2 port, whereas no switchport will make it behave like a Layer 3 port; is it a toggle. By default, a Layer 3 switch will have all of the ports in Layer 2 mode. By issuing the no switchport command, we will be able to assign IP addresses to Layer 3 ports.
Switch(config)#Switch(config)#conf t
Switch(config)#interface fa0/5
Switch(config-if)#no switchport
Switch(config-if)#
%LINEPROTO-5-UPDOWN: Line protocol on Interface FastEthernet0/5, changed state to down
%LINEPROTO-5-UPDOWN: Line protocol on Interface FastEthernet0/5, changed state to up
Switch(config-if)#ip address 192.168.1.50 255.255.255.0
Switch(config-if)#
- If the switch needs to route using the virtual router, we need to be able to assign IP addresses to that virtual router. The virtual router inside the switch will be acting as the Default Gateway. This is done by creating virtual interfaces using the command interface vlan X, where X is the VLAN ID. You can shutdown or bring up this interface, just like any other interface.
Switch(config)#vlan 10Switch(config-vlan)#name Management
Switch(config-vlan)#exit
Switch(config)#int vlan 10
Switch(config-if)#
%LINK-5-CHANGED: Interface Vlan10, changed state to up
%LINEPROTO-5-UPDOWN: Line protocol on Interface Vlan10, changed state to upSwitch(config-if)#ip add 11.11.11.11 255.255.255.0
Switch(config-if)#end
Switch#
%SYS-5-CONFIG_I: Configured from console by console
Receive our Cisco CCNA Packet Tracer!
Get our complete tutorial in PDF
We can check for the routed ports by looking at the routing table on the Layer 3 switch. We use the same command we did on a router, namely sh ip route.
Switch#
Switch#sh ip route
Codes: C – connected, S – static, I – IGRP, R – RIP, M – mobile, B – BGP
D – EIGRP, EX – EIGRP external, O – OSPF, IA – OSPF inter area
N1 – OSPF NSSA external type 1, N2 – OSPF NSSA external type 2
E1 – OSPF external type 1, E2 – OSPF external type 2, E – EGP
i – IS-IS, L1 – IS-IS level-1, L2 – IS-IS level-2, ia – IS-IS inter area
* – candidate default, U – per-user static route, o – ODR
P – periodic downloaded static route
Gateway of last resort is not set
11.0.0.0/24 is subnetted, 1 subnets
C 11.11.11.0 is directly connected, Vlan10
C 192.168.1.0/24 is directly connected, FastEthernet0/5
Switch#
Let’s see the Layer 3 switch in action. Build the following topology:
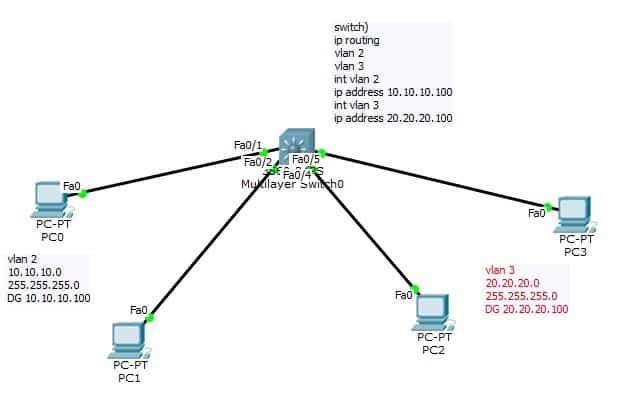

We start by creating the VLAN’s and assign ports to them, just like a L2 switch.
Switch>
Switch>en
Switch#conf t
Enter configuration commands, one per line. End with CNTL/Z.
Switch(config)#vlan 2
Switch(config-vlan)#name Sales
Switch(config-vlan)#vlan 3
Switch(config-vlan)#name EGR
Switch(config-vlan)#exit
Switch(config)#interface range fa0/1 – 2
Switch(config-if-range)#sw
Switch(config-if-range)#switchport mode
Switch(config-if-range)#switchport mode acc
Switch(config-if-range)#switchport mode access
Switch(config-if-range)#sw
Switch(config-if-range)#switchport
Switch(config-if-range)#switchport acc
Switch(config-if-range)#switchport access vlan
Switch(config-if-range)#switchport access vlan 2
Switch(config-if-range)#int range fa0/4 – 5
Switch(config-if-range)#sw
Switch(config-if-range)#switchport mode
Switch(config-if-range)#switchport mode acc
Switch(config-if-range)#switchport mode access
Switch(config-if-range)#sw
Switch(config-if-range)#switchport acc
Switch(config-if-range)#switchport access vl
Switch(config-if-range)#switchport access vlan 3
Switch(config-if-range)#
Let’s check the VLAN port assignments, just like a Layer 2 switch:
Switch#sh vlan br
| VLAN | Name | Status | Ports |
| 1 | default | active | Fa0/3, Fa0/6, Fa0/7, Fa0/8
Fa0/9, Fa0/10, Fa0/11, Fa0/12 Fa0/13, Fa0/14, Fa0/15, Fa0/16 Fa0/17, Fa0/18, Fa0/19, Fa0/20 Fa0/21, Fa0/22, Fa0/23, Fa0/24 Gig0/1, Gig0/2 |
| 2 | Sales | active | Fa0/1, Fa0/2 |
| 3 | EGR | active | Fa0/4, Fa0/5 |
| 1002 | fddi-default | active | |
| 1003 | token-ring-default | active | |
| 1004 | fddinet-default | active | |
| 1005 | trnet-default SW1# | active |
Assign IP addresses to our hosts and set the Default Gateway as per the topology. Pings to hosts in the same VLAN will succeed; however, pings to hosts from different VLAN will fail (no inter-vlan communication).
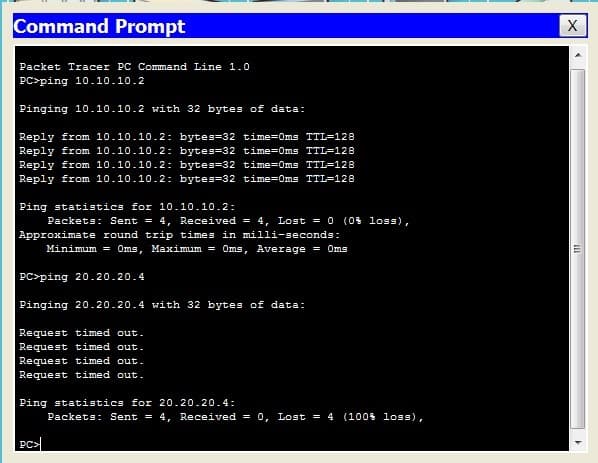

Create the virtual interfaces on the Layer 3 switch which will act as the Default Gateway:
Switch#
Switch#conf t
Enter configuration commands, one per line. End with CNTL/Z.
Switch(config)#int vlan 2
Switch(config-if)#
%LINK-5-CHANGED: Interface Vlan2, changed state to up
%LINEPROTO-5-UPDOWN: Line protocol on Interface Vlan2, changed state to up
Switch(config-if)#ip add 10.10.10.100 255.255.255.0
Switch(config-if)#int vlan 3
Switch(config-if)#
%LINK-5-CHANGED: Interface Vlan3, changed state to up
%LINEPROTO-5-UPDOWN: Line protocol on Interface Vlan3, changed state to up
Switch(config-if)#ip add 20.20.20.100 255.255.255.0
Switch(config-if)#end
Switch#
%SYS-5-CONFIG_I: Configured from console by console
Look at the routing table on the Layer 3 switch. We expect to see the virtual interfaces with connected networks:
Switch#sh ip route
Default gateway is not set
Host Gateway Last Use Total Uses Interface
ICMP redirect cache is empty
Note the routing table is empty, why? We have not enabled the routing feature on the Layer 3 switch. Let’s enable it now:
Switch#conf t
Enter configuration commands, one per line. End with CNTL/Z.
Switch(config)#ip routing
Switch(config)#end
Switch#
%SYS-5-CONFIG_I: Configured from console by console
Let’s look at the routing table, now that routing has been enabled:
Switch#sh ip route
Codes: C – connected, S – static, I – IGRP, R – RIP, M – mobile, B – BGP
D – EIGRP, EX – EIGRP external, O – OSPF, IA – OSPF inter area
N1 – OSPF NSSA external type 1, N2 – OSPF NSSA external type 2
E1 – OSPF external type 1, E2 – OSPF external type 2, E – EGP
i – IS-IS, L1 – IS-IS level-1, L2 – IS-IS level-2, ia – IS-IS inter area
* – candidate default, U – per-user static route, o – ODR
P – periodic downloaded static route
Gateway of last resort is not set
10.0.0.0/24 is subnetted, 1 subnets
C 10.10.10.0 is directly connected, Vlan2
20.0.0.0/24 is subnetted, 1 subnets
C 20.20.20.0 is directly connected, Vlan3
Switch#
A ping to the Default Gateway and a ping to hosts across VLAN’s should now succeed. Let’s verify:
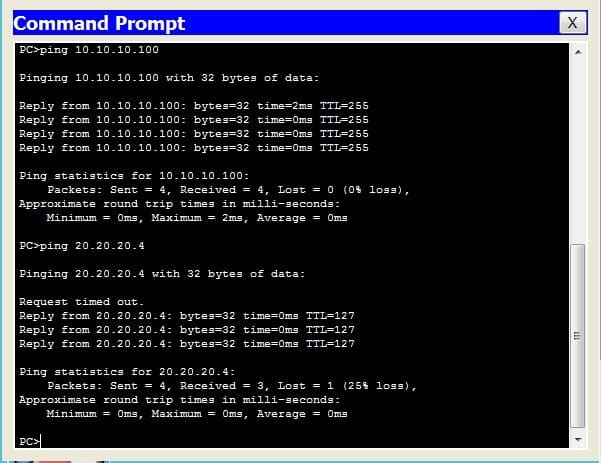

To test a routed port, let’s add a router to the topology:
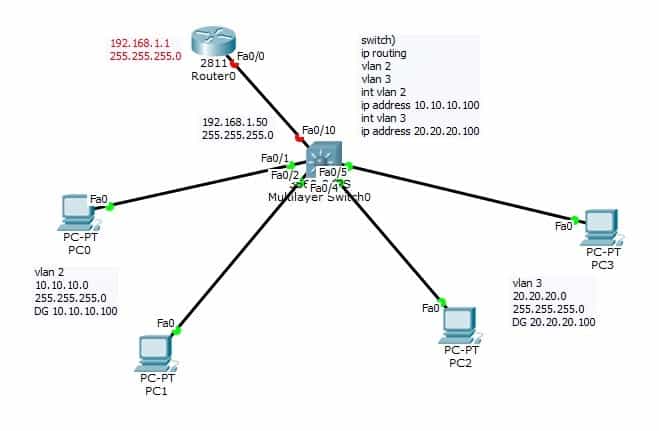

On the switch, go to interface fa0/10 and configure the port:
Switch#
Switch#conf t
Enter configuration commands, one per line. End with CNTL/Z.
Switch(config)#int fa0/10
Switch(config-if)#no sw
Switch(config-if)#no switchport
Switch(config-if)#ip add
Switch(config-if)#ip address 192.168.1.50 255.255.255.0
Switch(config-if)#end
Switch#
%SYS-5-CONFIG_I: Configured from console by console
On the router, go to interface fa0/0 and configure the port:
Router>en
Router#conf t
Enter configuration commands, one per line. End with CNTL/Z.
Router(config)#int fa0/0
Router(config-if)#ip add 192.168.1.1 255.255.255.0
Router(config-if)#no shut
Router(config-if)#
%LINK-5-CHANGED: Interface FastEthernet0/0, changed state to up
%LINEPROTO-5-UPDOWN: Line protocol on Interface FastEthernet0/0, changed state to up
Back on the Layer 3 switch, let’s check the routing table:
Switch#
Switch#sh ip route
Codes: C – connected, S – static, I – IGRP, R – RIP, M – mobile, B – BGP
D – EIGRP, EX – EIGRP external, O – OSPF, IA – OSPF inter area
N1 – OSPF NSSA external type 1, N2 – OSPF NSSA external type 2
E1 – OSPF external type 1, E2 – OSPF external type 2, E – EGP
i – IS-IS, L1 – IS-IS level-1, L2 – IS-IS level-2, ia – IS-IS inter area
* – candidate default, U – per-user static route, o – ODR
P – periodic downloaded static route
Gateway of last resort is not set
10.0.0.0/24 is subnetted, 1 subnets
C 10.10.10.0 is directly connected, Vlan2
20.0.0.0/24 is subnetted, 1 subnets
C 20.20.20.0 is directly connected, Vlan3
C 192.168.1.0/24 is directly connected, FastEthernet0/10
Switch#
Notice that interface fa0/10 is acting like a routed port and has an IP address. Let’s see if we can ping the router:
Switch#ping 192.168.1.1
Type escape sequence to abort.
Sending 5, 100-byte ICMP Echos to 192.168.1.1, timeout is 2 seconds:
.!!!!
Success rate is 80 percent (4/5), round-trip min/avg/max = 0/0/0 ms
Switch#
Perfect. We have connectivity to the router. Now will a ping from the PC’s to the router succeed?
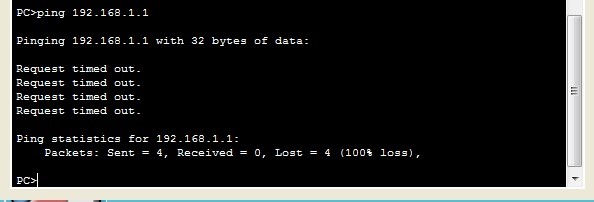

The ping test fails, why? Remember that we need to have bi-directional communication. The Layer 3 switch knows about the routers prefix and can route traffic out to the router; however, does the router know about the networks traffic is originating from? Does it know about 10.10.10.0 and 20.20.20.0 network? Let’s find out.
Router#
Router#sh ip route
Codes: C – connected, S – static, I – IGRP, R – RIP, M – mobile, B – BGP
D – EIGRP, EX – EIGRP external, O – OSPF, IA – OSPF inter area
N1 – OSPF NSSA external type 1, N2 – OSPF NSSA external type 2
E1 – OSPF external type 1, E2 – OSPF external type 2, E – EGP
i – IS-IS, L1 – IS-IS level-1, L2 – IS-IS level-2, ia – IS-IS inter area
* – candidate default, U – per-user static route, o – ODR
P – periodic downloaded static route
Gateway of last resort is not set
C 192.168.1.0/24 is directly connected, FastEthernet0/0
Router#
The router only knows about the connected network, namely the link between the Layer 3 switch and the router. It does not know about networks behind the Layer 3 switch. How can we correct this? We saw a number of options; we can configure a default route, or a static route. Other options include dynamic routing with RIP, EIGRP, or OSPF. Let’s configure a couple of static routes here:
Router#
Router#conf t
Enter configuration commands, one per line. End with CNTL/Z.
Router(config)#ip route 10.10.10.0 255.255.255.0 192.168.1.50
Router(config)#ip route 20.20.20.0 255.255.255.0 192.168.1.50
Router(config)#end
Router#
%SYS-5-CONFIG_I: Configured from console by console
Are the routes in the routing table now?
Router#sh ip route
Codes: C – connected, S – static, I – IGRP, R – RIP, M – mobile, B – BGP
D – EIGRP, EX – EIGRP external, O – OSPF, IA – OSPF inter area
N1 – OSPF NSSA external type 1, N2 – OSPF NSSA external type 2
E1 – OSPF external type 1, E2 – OSPF external type 2, E – EGP
i – IS-IS, L1 – IS-IS level-1, L2 – IS-IS level-2, ia – IS-IS inter area
* – candidate default, U – per-user static route, o – ODR
P – periodic downloaded static route
Gateway of last resort is not set
10.0.0.0/24 is subnetted, 1 subnets
S 10.10.10.0 [1/0] via 192.168.1.50
20.0.0.0/24 is subnetted, 1 subnets
S 20.20.20.0 [1/0] via 192.168.1.50
C 192.168.1.0/24 is directly connected, FastEthernet0/0
Router#
Can we ping from the PC’s?
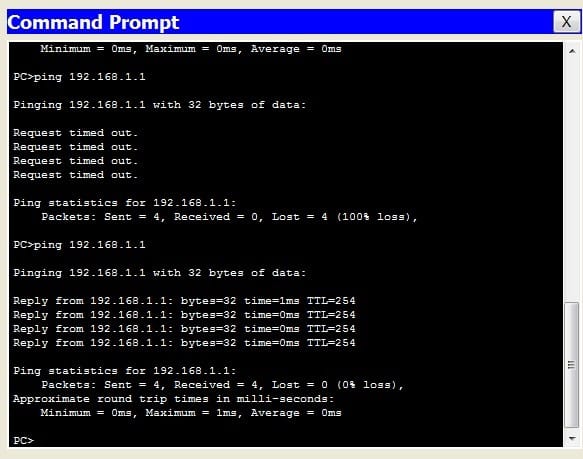

Yes, we now have connectivity. Remember, if packets are routed to a destination, a route back must exist. Also, the route taken to a destination is not necessarily the route that is taken back.
[bs_icon name=”glyphicon glyphicon-expand”] Watch the video and you will be able to understand how to configure Multi-Layer Switch much better and Please subscribe to our YouTube Channel.



Want more information on how to become Cisco CCNA Certified? Learn more!
Join our Cisco CCNA facebook study group!
Also published on Medium.
