

Establishing Network Connections
CompTIA A+ Core 2 Section 1.8
VPN
Active reconnaissance is a type of computer attack in which an intruder engages with the targeted system to gather information about vulnerabilities. This may be through automated scanning or manual testing using various tools like ping, traceroute, netcat etc. This type of recon requires that attacker interact with the target. This recon is faster and more accurate, however it also makes much more noise. Since the attacker have to interact with the target to gain information, there’s an increased chance that the recon will get caught by a firewall or one of the network security devices. (Intrusion Detection Systems, network firewalls, etc.)
How to Connect to a VPN in Windows 10
Note that some VPN providers offer their own desktop clients, which means you won’t need the setup process described in this guide.
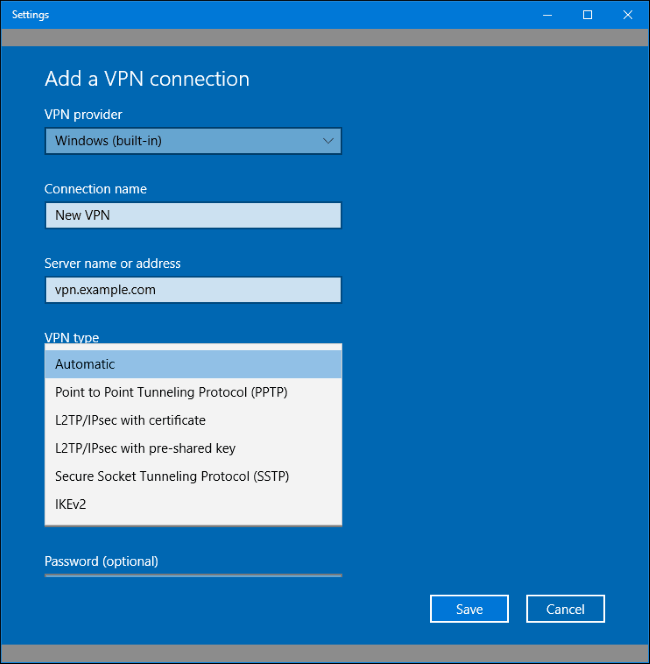
Windows 10 supports PPTP, L2TP/IPsec, SSTP, and IKEv2 connections without any third-party software.
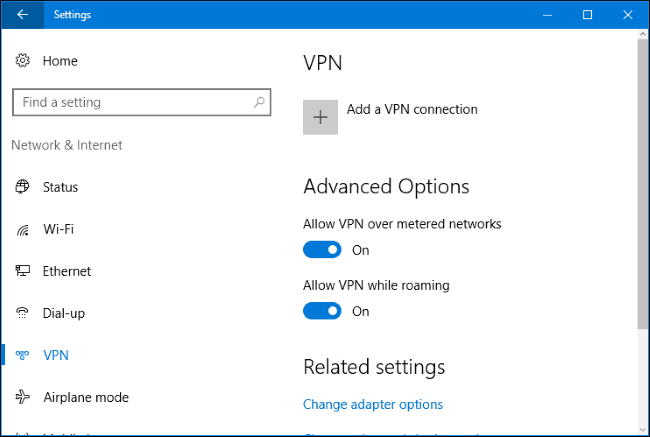
To connect to a VPN on Windows 10, head to Settings > Network & Internet > VPN. Click the “Add a VPN connection” button to set up a new VPN connection.
Provide the connection details for your VPN. You can enter any name you like under “Connection Name”. This name is just used on your computer to help you identify the VPN connection.
Your VPN provider should be able to provide you with these details. If the VPN is provided by your employer, your employer’s IT department should provide you with the details you’ll need to connect.
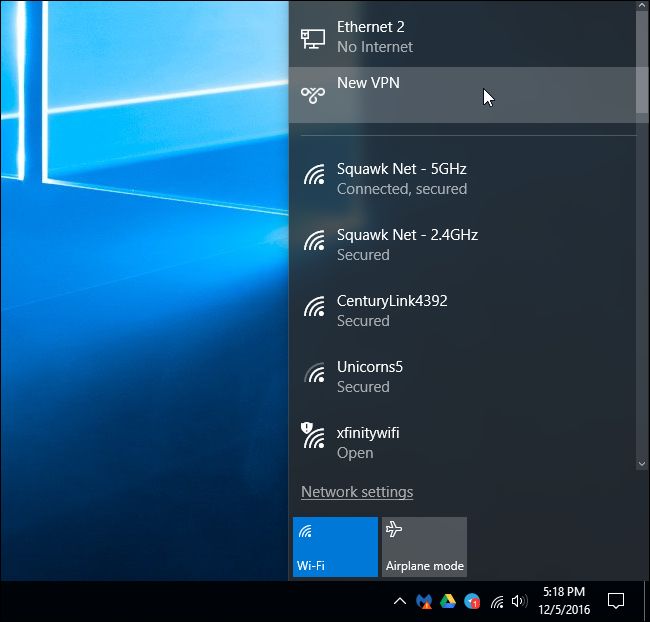
Once you’ve set up a VPN, you’ll see it in the network popup menu next to any nearby Wi-Fi networks.
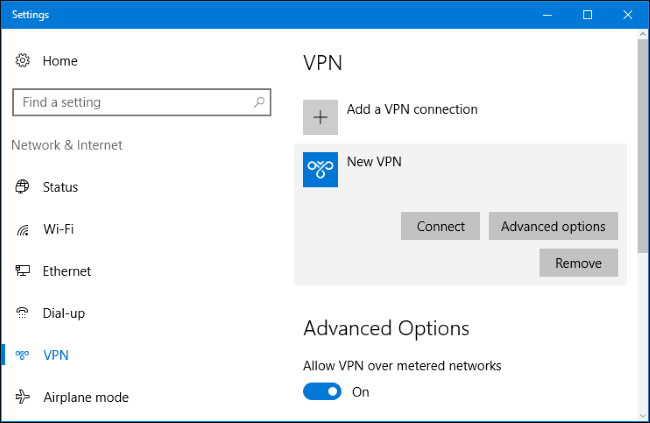
Click the network name in the popup menu and Windows will open the Settings > Network & Internet > VPN window for you. Select the VPN and click “Connect” to connect to it. You can also configure or remove VPN connections from here.
Dial-ups
How to Connect to a Dial-up in Windows 7
A Dial-up connection is one of the first forms of internet service. This type of connection relies on the use of traditional telephone lines to carry data packets and provide users with access to the web. Although popularly used during the days when the internet was still young, it is currently labeled as an outdated method of connecting to the internet because of its slow data transfer speeds, and its reliance on telephone lines when users access the internet. This means that a home dial-up connection only provides one service at a time and that people in a household with a dial-up connection are unable to use the phone to take calls and browse the internet at the same time.
Dial-up connections are able to provide users with a 56Kbps bandwidth[3], with the 56K modem only becoming available in 1998. Earlier modems ran at significantly slower speeds which, by today’s standards, would not be able to handle the data and media transfers that users need to functionally access a regular website, much less streaming videos on Youtube, viewing images on Instagram and the like.
1) Click the Start button
2) Select Control Panel
3) Select Network and Internet and select Connect to the Internet
4) Select Dial-up
5) In the dialogue box that appears enter the connection details:
Dial-up phone number
User name: (your account ID)
Password: (your NCF password)
Connection name: The default name is Dial-up Connection, but you can identify it as NCF or any other name that you want instead.
6) Allow other people to use this connection: check this if you want other users of your computer who have their own accounts on your PC to have access to the dial-up connection.
Click Connect to dial the connection.
Open your web browser and it should now load your home page, indicating that you are connected to the internet.
After you have set up the connection any time you open your web browser it should automatically dial NCF and connect you to the internet
Wireless
WLAN means wireless local area network.
WLAN is a type of Local Area Network (LAN) that uses high frequency radio waves rather than wires to communicate and transmit data. It is a flexible data communication system implemented as an extension to or as an alternative for, a wired LAN.
A WLAN can be built using any of several different wireless network protocols, most commonly Wi-Fi or Bluetooth.
How to Set-up a wireless router
Step 1: Connect your router to your modem
Don’t plug your router into the power outlet just yet. Instead, the first thing you’re going to do is connect your modem to the WAN port, with an Ethernet cable.
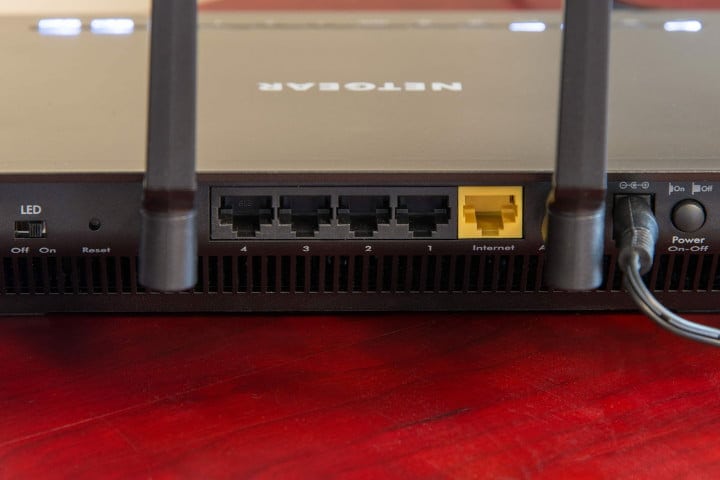
Not sure what the WAN port is? Most consumer routers feature a group of Ethernet ports, several of which are called the LAN ports (local area network) and another called the WAN (wide area network) port. The WAN port looks the same as the LAN ports, but it’s often a different color and spaced apart from them. In the above photo, for instance, the WAN port is yellow and labeled “Internet.” Sometimes it will be labeled “WAN.” This port is intended to connect your router to the modem, and the outside world from there. The LAN ports are intended for connecting to local devices.
Plug one Ethernet cable into your modem, and the other end into your router’s WAN port. Then plug your router’s power adapter into the wall
Step 2: Connect your router to your computer
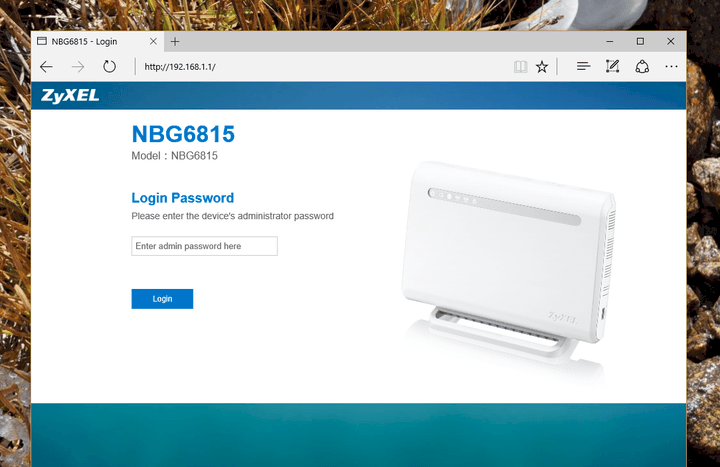
Connect a computer manually to the router using an Ethernet cable. Once you’re connected, head to your router’s configuration page. This is basically a website hosted on your router, and it’s a traditional way to configure your router’s settings. How to find it can vary, but it almost always means typing 192.168.1.1 into the address bar of your preferred browser, then hitting Enter.
Alternative Method:
Today’s modems can typically be set up by a mobile app that will automatically walk you through the setup process. It’s the most effective method, but you have to make sure you choose the right app.
Instructions for what app to use should be in your manual.
Now connect to your latent Wi-Fi network. This is usually a simple process: Head to the settings on your phone or computer, and choose the Wi-Fi/Network option (Google just has you scan a QR code, so this process can vary a little). Look for your router’s name here: Your router should have a default SSID name that’s printed on the back out of the router, along with the default network key. Use the key to log into the network.
Once connected, launch the router management app to begin the setup!
Step 3: Create a username and password, or find the existing one
For most new routers, you’ll be asked to create an app name (again, this is called an SSID) and password. Make sure this password is unique and secure, because anyone who has it can do all kinds of nasty things to your network.
WPA2 encryption is currently the standard for security and you should always choose it if given an option for your security protocol. Make sure you choose a long password, too, one that is distinct from the admin password you set earlier and ideally doesn’t include words from the dictionary or an easily guessed name (like the name of your pet). Afterwards, store it somewhere secure.
A used router, however, may already have a password and need to be reset. Most routers have a recessed reset button on the back. Holding down the “reset” button with a paperclip for at least 30 seconds will do the trick. Leave the power on, and wait for the router to rest. It should utilize the default settings when it restarts, meaning the default username and password will now grant you access to settings.
Step 3: Continue setting up your router
Set up other settings such as parental controls, automatic updates, and more. You can tweak these settings and more later from the app, but pay attention to the walkthrough and everything it teaches you. You should learn about guest access, monitoring activity, and more. When finished, the app will configure network settings and finish setting up your network. You can now explore the app at leisure to learn more.
Additional information
With these steps out of the way, your router should be ready to use. Go ahead and connect your devices, and enjoy!
Of course, there’s a lot more you can configure, if you dig into the settings. Setting up port forwarding can be useful, and the true power users should consider replacing their firmware with DD-WRT to get access to all kinds of settings that are otherwise not offered. For most users, however, working Wi-Fi and secure access to the administrative backend is a great place to start.
Wired
What is LAN?
A local area network (LAN) consists of a series of computers linked together to form a network in a circumscribed location. The computers in a LAN connect to each other via TCP/IP ethernet. A LAN is normally exclusive to an organization, such as a school, office, association or church.
What is wired LAN?
Wired connections are by far the most common. The main media in use are coaxial cable, twisted pairs and fibre optics. For each of these, specific network technologies or specifications have been designed. The medium must have properties that will ensure a reasonable error performance for a guaranteed distance and rate of date delivery (i.e. speed). It must also support two-way or multiway communications.
WWAN
Wireless WAN is a wide area network in which separate areas of coverage or cells are connected wirelessly to provide service to a large geographic area.
WWAN services are typically delivered to smart phones and other handheld devices sold by cellular service providers and their retail partners but other mobile devices can use them as well. Some netbooks are available with WWAN cards installed; you can also purchase wireless WAN cards to install yourself. Unlike Wi-Fi cards, which can be used in just about any hotspot, WWAN devices must be provisioned specifically for access to your service provider’s network. Your service provider will take care of billing for roaming access that involves other provider networks.
The three families of WWAN technologies are GSM/UMTS, CDMA One/CDMA2000 and WiMAX. In the United States, service providers include AT&T, Clearwire, Sprint and Verizon. Wireless WAN services are expected to become increasingly available as 4G technologies mature.
A+ certification develops PC hardware and software troubleshooting skills. Professionals in the information technology industry may find A+ certification to be an advantage when searching for jobs. Technicians that have the certification tend to earn 5 to 15 percent more than those that don’t. Some employers require A+ certification for entry-level technical support positions. IT professionals that obtain the certification pursue many career paths, such as technical support specialist and IT support administrator.https://asmed.com/course/comptia-a-boot-camp/