Network shares 2
Given a scenario configure MS windows network on a client/desktop
Network sharing is a feature that allows resources such as files, documents, folders, media, etc., to be shared over a network. These resources are made accessible to other users/computers over a network. In this post, we will describe how you can manage administrative shares in Windows 10.
Network sharing is also known as Shared resources. It enables access to information by more than one person through more than one device at the same or at different times. By connecting a device to a network, other users/devices in the network can share and exchange information through this network.
Managing Administrative Shares
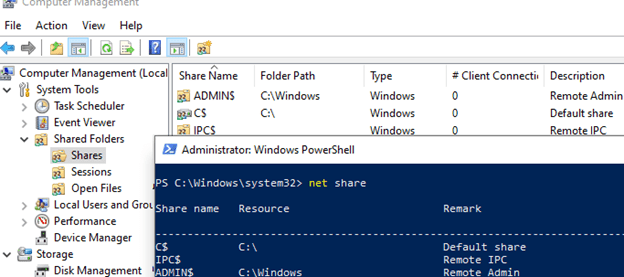
Administrative Shares are used in Windows to remotely access and manage a computer. If you open the computer management console (compmgmt.msc), expand the System Tools -> Shared Folders -> Share section, or run the net share command, you will see a list of admin shared folders (these folders are hidden in the network neighborhood and access to them is restricted).
What are Administrative Hidden Shares on Windows?
By default, Windows creates the following admin shares:
Admin$ — Remote admin (this is the %SystemRoot% directory)
IPC$ — Remote IPC (used in named pipes)
C$ — Default Drive Share
If there are other partitions on the computer that are assigned a drive letter, they are also automatically published as admin shares (D$, E$, etc.). If you are using a shared printer, then there should be a Print$, or FAX$ share if you are using a fax server.

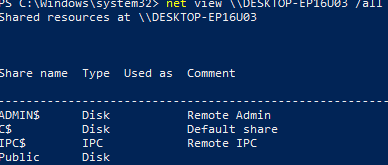
Note that the names of administrative shares end with a $. This mark causes LanmanServer to hide these SMB resources when accessed over the network (specific files and folders in the shared network folder can be hidden using Access-Based Enumeration). If you try to view a list of shared network folders available on the computer in File Explorer (\\computername), you won’t see them in the list of available SMB shares.

Most third-party file managers for Windows have the options to automatically display available admin resources on remote computers when browsing the network.
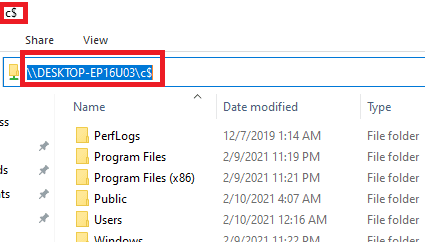
In order to view the contents of an admin share from File Explorer, you must specify its full name. For example, \\computername\c$. This command will open the contents of the local drive C and allow you to access the file system of the system drive of the remote computer.
Only members of the local computer Administrators group (and the Backup Operators group) can get access to administrative shares, provided that you have SMB enabled, turned on file and printer sharing and access via TCP port 445 is not blocked by Windows Defender Firewall rules .

Sources: TheWindowsClub
Are you getting ready to take your A+ exam? Did our tips help? Be sure to comment in on ways we can improve our guide process as well as share your own success stories! We are grateful to help you succeed with the A+ and hope to see you as a certified A+ member soon!


