

Step 1) I will take image of One of My Web server called Webserver1, when I go to public IP address I will see the
content of the Web server
Step 2) I will stop the Instance; then Take an image of it. Call it “Webserver1Image”
Step 3) Now I will see the New Image under the Image on the left ( Under AMI)
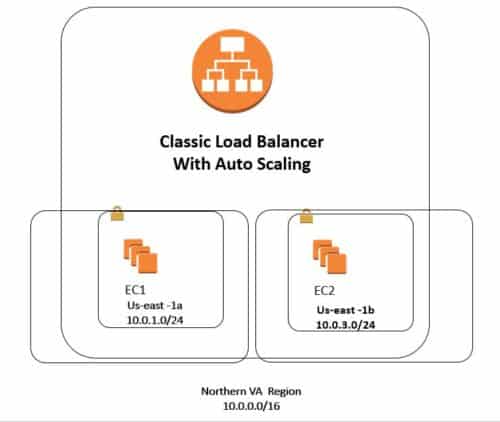
Step 4) I will go and create an Elastic Load Balance; and I will call it AutoscaleELB, then choose a Sec Group
and then I will pick two Subnets on different AZ ( in here it will be us-east-1a and us-east-1b
Step 5 ) I Will not add any instance under this ELB, but I will add it later on with Autoscaling
Step 6) Now I will see my AMI is already online
Step 7) now I go and start My Auto scaling Process, on the left, I click on launch configuration
Step 8) click to create an “Auto Scaling Group”
Step 9) First you need to define a template that your Auto Scaling group will use to launch instances.
Step 10) Click on “Create Launch configuration “
Step 11) Here you will pick “From my AMI “ from left it is called “Webservwer1Image “ which we did on step2
Step 12 ) After selecting the AMI, called it “AutoscalingLunchconfiguration”
Step 13) Click Advanced configuration and for the IP address pick :
Assign a public IP address to every instance.
Step 14) For Security group pick something with HTTP access
Step 15) Use one of your Keys and start it up
Step 16) now it will take you to Auto scaling group, lets called it “Auto Scaling group 1 “
Step 17) here make sure pick correct VPC and then “Start with two instances” add the AZ from subnet drop down and
pick Correct Subnet us-east-1a and us-east-1b, ( Must Match with ELB that I created before )
Step 17 b) Make sure click Advanced and in here picking ELB ( that you created in Step 4, that was called: “AutoscaleELB”
Step 18 )Now I will configure scaling Policy :
( in here you will tell if the CPU is above 80% for
example add one instance, and If the CPU is below 30% you will remove one of the instances.
Scale between Min 2 and Max 5
Step 19 ) Scale between 2 and 5, that is if My CPU utilization goes above 80 %, the maximum EC2 instance I can have
will be 5 and Min will be 2
Step 20) Now I will add some Policy that is if CPU goes above 80% add “1” instance, and if the CPU drops below
30 % I will remove one EC2 instance. Remember the Min EC2 instance will be 2 and Max EC2 instance will
be 5
Step 21 ) now you can create a notification, then put your e-mail address for
Step 22 ) As it is finalizing the process when I go to EC2 I will see two instances will come up, let us call them as follow
Autoscaling1 created 9-17-2017
Autoscaling2 created 9-17-2017
Step 23 ) Now if I go to ELB, I will see it last two instances that were created from Auto scaling and Also I will see the Long
DNS name, when I copy and paste DNS, I will see the same content of Web server 1 that was tested in Step 1
Step 24 ) Now I will do a test since I can not create an 80% CPU utilization; what I can do I will make sure one of the EC2
instance dies ( so I terminate) and see if Auto scaling group create a new EC2, so I will select EC2 from us-east-1a
and terminate it.
Step 25 ) Now after killing the EC2 in us-east-1a I will see that under the Load balancer it has only one in service
which is US-east-1b and when I go back to EC2, I will see the auto scaling will provisioning a new EC2 in
us-east-1a and when I go back to the Elastic Load balancer, I will see now two EC2, one from us-east-1a and
another one from us-east-1b. Also, go to Auto scaling group and check the activity Tab, you will see one
terminating and then another one is initializing.
Step 26) Now When I go to Auto scaling group on the left and click on the History Tab; I will see the history what
is happening.
Step 27 ) let us go to EC2 and give the new EC2 name as follow :
Autoscaling 3 created 9-17-2017
Step 28 ) now we see this {Autoscaling 3 created 9-17-2017 } has been shown under the Elastic Load Balancer
Want more information on how to become Amazon AWS Certified? Learn more!
