A security group acts as a virtual firewall to control the traffic for its associated instances. To use a security group, you add the inbound rules to control incoming traffic to the instance, and outbound rules to control the outgoing traffic from your instance. To associate a security group with an instance, you specify the security group when you launch the instance. If you add and remove rules from the security group, we apply those changes to the instances associated with the security group automatically.
Your VPC comes with a default security group. Any instance not associated with another security group during launch is associated with the default security group. In this exercise, you’ll create a new security group,WebServerSG, and specify this security group when you launch an instance into your VPC.
Topics
- Rules for the WebServerSG Security Group
- Creating Your WebServerSG Security Group
Rules for the WebServerSG Security Group
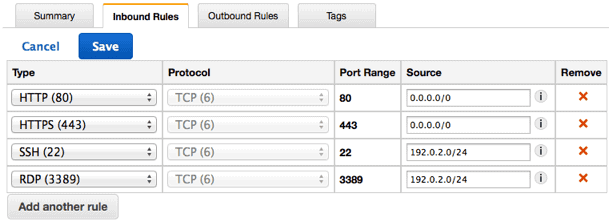
The following table describes the inbound and outbound rules for the WebServerSG security group. You’ll add the inbound rules yourself. The outbound rule is a default rule that allows all outbound communication to anywhere — you do not need to add this rule yourself.
| Inbound | |||
| Source IP | Protocol | Port Range | Comments |
| 0.0.0.0/0 | TCP | 80 | Allows inbound HTTP access from anywhere. |
| 0.0.0.0/0 | TCP | 443 | Allows inbound HTTPS access from anywhere. |
| Public IP address range of your home network | TCP | 22 | Allows inbound SSH access from your home network to a Linux/UNIX instance. |
| Public IP address range of your home network | TCP | 3389 | Allows inbound RDP access from your home network to a Windows instance. |
| Outbound | |||
| Destination IP | Protocol | Port Range | Comments |
| 0.0.0.0/0 | All | All | The default outbound rule that allows all outbound communication. |
Creating Your WebServerSG Security Group
You can create your security group using the Amazon VPC console.
To create the WebServerSG security group and add rules
- Open the Amazon VPC console at https://console.aws.amazon.com/vpc/.
- In the navigation pane, choose Security Groups.
- Choose Create Security Group.
- In the Group name field, enter
WebServerSGas the name of the security group, and provide a description. You can optionally use the Name tag field to create a tag for the security group with a key ofNameand a value that you specify. - Select the ID of your VPC from the VPC menu, and then choose Yes, Create.
- Select the
WebServerSGsecurity group that you just created (you can view its name in the Group Namecolumn). - On the Inbound Rules tab, choose Edit and add rules for inbound traffic as follows, and then choose Savewhen you’re done:
- Select HTTP from the Type list, and enter
0.0.0.0/0in the Source field. - Choose Add another rule, then select HTTPS from the Type list, and enter
0.0.0.0/0in the Sourcefield. - Choose Add another rule. If you’re launching a Linux instance, select SSH from the Type list, or if you’re launching a Windows instance, select RDP from the Type list. Enter your network’s public IP address range in the Source field. If you don’t know this address range, you can use
0.0.0.0/0for this exercise.Caution
If you use
0.0.0.0/0, you enable all IP addresses to access your instance using SSH or RDP. This is acceptable for the short exercise, but it’s unsafe for production environments. In production, you’ll authorize only a specific IP address or range of addresses to access your instance.
- Select HTTP from the Type list, and enter

Related Pages:
WHAT IS AMAZON VPC?
GETTING STARTED WITH AMAZON VPC
- Step 1: Create the VPC
- Step 2: Create a Security Group
- Step 3: Launch an Instance into Your VPC
- Step 4: Assign an Elastic IP Address to Your Instance
- Step 5: Clean Up
Source By: <docs.aws.amazon.com>
To Become AWS Certified please Check out the Link;
Also published on Medium.


