

Amazon AWS EFS with ELB
EFS (Elastic File System) Features
- EFS is storage option for EC2, that can be attached to more than one EC2, remember Volume can only be attached to one EC2
- EFS is Elastic, and it is scalable ( The storage capacity will increase or decrease as you add files to it, so it is not like Volume that you start for example by 30 GB)
- Supports the Network File System Version 4 (NFSv4) protocol
- You only pay for the storage you use (no pre-provisioning required)
- Can scale up to the petabytes
Now will do a Lab,
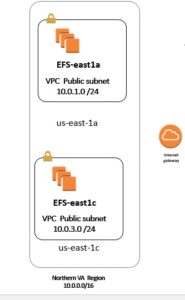
In here we will have two EC2 instances (One on each Subnet and different AZ), then we will create an EFS and Mount on this EC2, I will boot up and Amazon AMI and then install the Apache Web server, and on one of the EC2 we will create the index, html and we will see it will be on 2nd EC2 and then we will test it via Elastic ELB and we will see our sample web page.
Step 1) I go to AWS and click a new EFS
Step 2) I choose the VPC=10.0.0.0/16 then I will choose two Subnet 2 and Subnet 3 in each different AZ
us-east-1a with Subnet 1= 10.0.1.0 /24
us-east-1c with subnet 3= 10.0.3.0/24
Make sure pick correct Security Group ( Here I pick RDP, HTTP, ICMP) and default security group,
Click Next
Step 3) Give the Name =EFSWebsites, leave the default and click next
Step 4) now it should be creating the EFS ( when it is finished it will show Available)
Step 5) Now I will go to EC2 and create two EC2 with Amazon AWS and call it EFS-east1a and EFSeast1c
Put the first EC2 ( called EFS-east1a inside the Subnet 1)
Put the 2nd EC2 ( called EFS-east1c inside the Subnet 3)
Step 6) make sure use same security group as above.
Step 7) Now I will SSH to the first instance ( EFS-east1a) and here we will use the keygen to create a .ppk ( since my key was in format of .pem
Step 8) in order Yum with two windows, please make sure pay attention to private IP address 10.0.1.x ( 1st instance) and 10.0.3.x (2nd instance)
Step 9) type these
sudo su ( to put in root position)
yum update -y
yum install httpd –y ( to install the Apache server)
Service httpd start ( to start the Web server service)
Step 10) now above will create a directory for us at /var/www/html
So let’s go to that directory
[root@ip-10-0-1-8 ec2-user]# cd /var/www/html
[root@ip-10-0-1-8 html]# ls
As we see when I type ls there is nothing inside my directory now.
Step 11) now go to the 2nd instance (10.0.3.x) and ssh to it and type same commands as before
make sure go back to root on both instance:
Step 12) Now I will go and create a classic ELB (call it EFSELB) and include these two instances and make sure pick correct Security group as for those instances. ( pick also default Sec group)
Step 13) change the interval to 6 sec and also the Healthy threshold to 2 retry.
Step 14) If I go to instance tab; I will see the status out of service ( since we have no index.html )
Step 15) Now I go back to EFS and follow the instruction on what to do: in here click on :
Amazon EC2 mount instructions
I do not need to do these steps since my Linux AMI already has it :
————————————————–Skip these steps—————————————-
Install the nfs client on your EC2 instance.
- On an Amazon Linux, Red Hat Enterprise Linux, or SuSE Linux instance:
sudo yum install -y nfs-utils - On an Ubuntu instance:
sudo apt-get install nfs-common
——————————————————————————————————
Now if you get this message in the box :
Your Amazon VPC is not currently configured to enable mounting using DNS names. To enable this feature go to the Amazon VPC console; in the Actions menu, select “Edit DNS Resolution” and “Edit DNS Hostnames” and make sure both are set to “Yes”. For instructions on mounting your file system using a mount target IP address instead of a DNS name, please see our technical documentation.
Now after you did the DNS now you can copy and paste this commands to Mount your file system
sudo mount -t nfs4 -o nfsvers=4.1,rsize=1048576,wsize=1048576,hard,timeo=600,retrans=2 fs-a9ffaee0.efs.us-east-1.amazonaws.com:/ efs
But now instead of /efs directory we will mount it at /var/www/html (at the both of instance only)
sudo mount -t nfs4 -o nfsvers=4.1,rsize=1048576,wsize=1048576,hard,timeo=600,retrans=2 fs-a9ffaee0.efs.us-east-1.amazonaws.com:/ /var/www/html
Step 16) if you paste above commands and does not work and it takes time; you need to go back to your both instance and make sure you have added the default security group ( also inside the EFS)
Step 17) now I will go to one of the instance ( for exam first instance) then I go to directory
Cd /var/www/html
And type nano index.html
And write something inside of it, then we will see this file inside 2nd instance
Step 18) Now when I go to next instance, I will see the index.html with same content
Step 19) So I have mounted this EFS file on directory /vasr/www/html
Step 20) Now if I go to my ELB, and I copy and paste long DNS name :
EFSELB-30545612.us-east-1.elb.amazonaws.com
I will see the content of index.html
Step 21) Now I can go to ROUTE 53 and create an “A” record with Alias and point to ELB, then try to open with my domain name
Hamedtest100.com
So as we see in here, it looks like
Here are the difference between EBS, EFS, and S3
Amazon EFS is a file storage service for use with Amazon EC2. Amazon EFS provides a file system interface, file system access semantics (such as strong consistency and file locking), and concurrently-accessible storage for up to thousands of Amazon EC2 instances.
Amazon EBS is a block-level storage service for use with Amazon EC2. Amazon EBS can deliver performance for workloads that require the lowest-latency access to data from a single EC2 instance.
Amazon S3 is an object storage service. Amazon S3 makes data available through an Internet API that can be accessed anywhere.
Want more information on how to become Amazon AWS Certified? Learn more!
