

Step1: Go to Cloud formation Page Create a stack
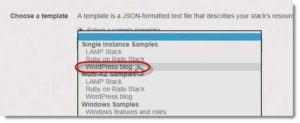
Step 2: Click on select from templates and choose WordPress Blog
Step 3: Choose the parameters like username, password, key etc
** make sure you choose the right ssh key because we need to log in to the EC2 server later
Step 4: On the tag page tag the Stack resources with “Wordpress Blog”
Step 5: Click next and Create
Step 6: Navigate to output section and click on the URL. This will take you to your blog.
Step 7: Choose username and password and click next.
Step 8: You should have a blog setup now.
Step 9: SSH into your EC2 and paste the following command
$ sudo chown -R apache:apache path/to/wordpress
Step 10: Go back to WordPress and you may now install themes and customize your page.
Step 11: Select the stack that we created earlier and click on Actions. Then delete the stack. This will delete all the resources that were created by the stack.
Want more information on how to become Amazon AWS Certified? Learn more!
