Power Supplies
Okay, now that we’ve tested our AC outlet and put some protective power devices into play, let’s go ahead and talk power supplies. The power supply is in charge of converting the alternating current (AC) drawn from the wall outlet into direct current (DC) to be used internally by the computer. It feeds the motherboard, hard drives, optical drives, and any other devices inside of the computer. Talk about a single point of failure! That is why many higher-end workstations and servers have redundant power supplies.
Planning Which Power Supply to Use
It is important to use a reliable brand of power supply that is UL listed (certified). There are a few other things to take into account when planning which power supply to use in your computer:
- Type of power supply and compatibility
- Wattage and capacity requirements
- Amount and type of connectors
Now, in our scenario we said that we need a power supply that can support many devices in our workstation; one that will output a lot of power. In this scenario the computer has two IDE hard drives, a CD-Burner, a DVD-ROM, one SATA drive, and a PCIe video card. And let’s just say that we use an ATX 12V 2.0 motherboard. So we need to look for a high–capacity, compatible ATX power supply with a decent amount of connectors for our devices. Let’s discuss planning now.
Types of Power Supplies and Compatibility
The most common form factor today is Advanced Technology Extended (ATX). Depending on the type of ATX, the main power connector to the motherboard will have 20 pins or 24 pins. Table 5.1 shows a few different form factors and their characteristics. The key is compatibility. In our scenario we have a previously built computer, which means that the case and motherboard are already compatible. If this computer was proprietary, we could go to the computer manufacturer’s website to find out the exact form factor, and possibly a replacement power supply for that model computer. Some third-party power supply manufacturers also offer replacement power supplies for proprietary systems. However, if this computer was custom built, we would need to find out the form factor used by the motherboard and/or case, and should open the computer and take a look at all the necessary power connections. Then we need to find a compatible power supply according to those specifications from a third-party power supply manufacturer. Table 5.1 displays the form factors you need to know for the exam.
Table 5.1. Common Power Supply Form Factors
| Form Factor | Main Power Connector | Other Characteristic |
| ATX | P1 20-pin connector | An older standard but you will still support it! |
| ATX 12V 1.0 – 1.3 | P1 20-pin connector & P4 4 pin 12V connector | Supplemental 6-pin AUX connector provides additional 3.3V and 5V supplies to the motherboard. |
| ATX 12V 2.0 | P1 24-pin connector (backward compatible) |
|
| ATX 12V 2.1 | P1 24-pin connector | Added a separate 6-pin power connector for PCIe video cards;
delivers 75 watts. |
| ATX 12V 2.2 | P1 24-pin connector | Added 8-pin power connector for PCIe video cards;
delivers150 watts. |
| ATX 12V 2.3 | P1 24-pin connector | Recommended efficiency is now 80% due to Energy star 4.0
Regulations. |
Figure 5.4 gives examples of a P1 20-pin (the white connector) and P1 24-pin connector (the black connector). Toward the left of the black connector you notice it has an additional four pins that can be separated from the main group of 20 pins. Both have locking tabs to keep the P1 connector fastened to the motherboard. (In the figure this is shown only on the 20-pin connector.)
24-pin and 20-pin power connectors

ExamAlert
Original ATX power supplies connect to the motherboard with a 20-pin connector. Newer ATX 12V 2.0 power supplies connect with a 24-pin connector.
There are many other types of form factors such as microATX, BTX, and NLX (covered in Chapter 2, “Motherboards”) and older form factors such as AT; however, the form factors listed in Table 5.1 are the important ones to know regarding power supplies for the A+ exam. For any other form factors, just remember that the power supply, case, and motherboard all need to be compatible.
Another important piece to consider is the type of case that is used. Larger cases require longer power cables to reach the devices. You can find the measurements for the cables on the power supply manufacturer’s website. There are several different types of cases that you need to be familiar with:
- Desktop: Lies horizontally, usually has one 5¼-inch drive bay.
- Mini-tower: Stands vertically, usually has two or three drive bays.
- Mid-tower: Usually has three or four bays.
- Full tower: Usually has six bays.
- Slim line: Compaq and the Playstation III and other third-party case manufacturers use this case design.
Many power supply manufacturers also make computer cases and often sell them as a package or to be purchased separately.
Wattage and Capacity Requirements
Power supplies are usually rated in watts. They are rated at a maximum amount that they can draw from the wall outlet and pass on to the computer’s devices. Remember that the computer will not always use all that power the way in which a light bulb does. And the amount depends on how many devices work and how much number crunching your processor does! In addition, when computers sleep or suspend, they use less electricity. What you need to be concerned with is the maximum amount of power all the devices need collectively. Most power-supply manufacturers today offer models that range from 300 watts all the way up to 1,000 watts. Although 300 watts is a decent amount of power for many computers, it might not suffice in our scenario. Devices use a certain amount of power defined in amps and/or watts. By adding all of the devices power consumption together, we can get a clearer picture of how powerful a power supply we need. Consult the manufacturer’s web page of the device for exact requirements. We said that in our scenario the computer has two IDE hard drives, a CD-Burner, a DVD-ROM, a floppy drive, and one SATA drive and a PCIe video card. It also has a quad core processor and 2GB of RAM (in two sticks).
After doing the math, it appears that the computer in our scenario needs about 400 watts or so to run smoothly. The power supply we purchase should be rated slightly higher just in case, so in this scenario we would obtain a 450-watt or 500-watt power supply. Most power supplies are rated for 15 amps, so it is important to connect the computer to a 15-amp circuit or higher.
Amount and Type of Power Connectors
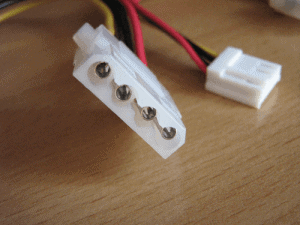
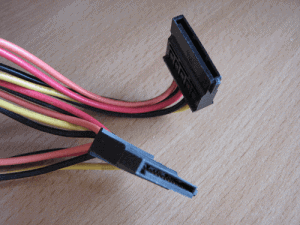
It is important to know how many of each type of power connector you need when planning which power supply to use. In our scenario we need four IDE power connectors (for the two hard drives, CD-Burner, and DVD-ROM), one floppy power connector, and one SATA power connector. You need to be familiar with each of these types of power connectors for the A+ exams. Be prepared to identify them by name and by sight. Table 5.2 defines the usage and voltages for the most common power connectors: Molex, mini, SATA, and PCIe, which are displayed in Figures 5.5 through 5.8.
Table 5.2. Power Connectors
| Power Connector | Usage | Pins and Voltages |
| Molex | IDE hard drives, optical drives, and other devices | Red (5V), black (G), black (G), yellow (12V) |
| Mini | Floppy drives | Red (5V), black (G), black (G), yellow (12V) |
| SATA | Serial ATA hard drives | 15-pin, 3.3V, 5V, and 12V |
| PCIe | PCI Express cards | 6-pin |
Molex power connector


Mini power connector

SATA 15-pin power connector


PCIe 6-pin power connector

**Source by wikipedia **
To Become Certified For CompTIA A+ Please Visit This Link ;


